
Table of Contents
I. 6 Yoga Poses to Improve Mobility and Flexibility and Build Strength and Balance
II. Yoga Poses for Improved Mobility
III. Yoga Poses to Build Strength and Increase Balance
6 Yoga Poses to Improve Mobility and Flexibility and Build Strength and Balance
Yoga is known for its ability to help calm the mind. Although it used to be speculation that yoga could help improve muscle strength, mobility, and balance, science now suggests this to be true.
As we age, our balance and mobility become increasingly important. A healthy body helps to maintain independence and a high quality of life. A recent study published in 2019 provided a yoga intervention for participants 60 years and older. The study is an attempt to synthesize existing evidence on the effects of yoga and quality of life in older adults.
The results were promising. The data analysis revealed an increase in balance, lower body flexibility, lower limb strength, perceived mental and physical health, sleep quality, and vitality for the yoga intervention group. Suffice to say, yoga is a helpful tool to incorporate into daily life. Yoga may help to improve mobility in our joints and tissues and decrease the risk of injury as we age. [1]
Yoga Poses for Improved Mobility
a. Wind Relieving Pose
As funny as this pose sounds, it can offer relief. Wind Relieving pose helps to compress the digestive tract and provides an opportunity for the hip joint to move into flexion. In this shape, you are using your hip flexor muscles such as psoas major, iliacus, rectus femoris, pectineus, and sartorius muscles. This shape offers relief for muscles that support your hip joint, by engaging then relaxing them, and can feel nice on the lower back as well. [2]
How To Do Wind Relieving Pose:
- Lay on your back with your legs extended on the floor
- Keep your left leg extended and relaxed
- Draw your right knee in towards your chest, bending at the knee joint, and interlacing your fingers across your right shin or behind your right thigh
- With the head and neck relaxed, take five to ten rounds of breath before switching legs
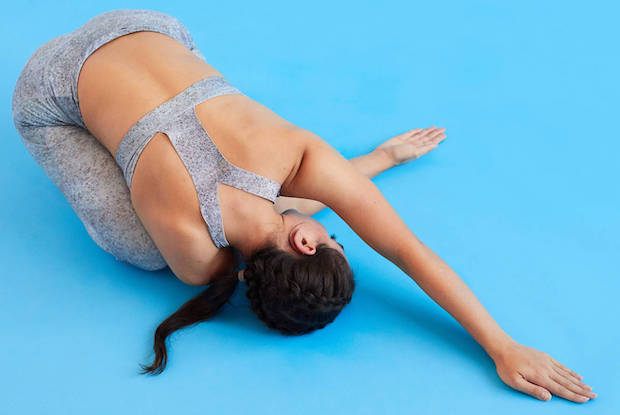
b. Thread the Needle
Thread the Needle pose, also known as Eye of the Needle or Figure 4 pose, is a shape that is quite effective at opening the muscles around your hips. This shape is also an excellent alternative to another more intense shape called Pigeon pose, which is often taught in yoga classes. Thread the Needle is a safer option for those with any knee or hip limitations or history of injury.
Piriformis syndrome is a distinct buttock or hip pain that may radiate down the leg, also known as sciatica. The sciatic nerve passes through the piriformis muscle. When the piriformis muscle is tense or tight it may cause irritation of the sciatic nerve. Thread the Needle is a useful pose to stretch the piriformis muscle. This video explanation offers good insight on how to perform Thread the Needle shape while protecting your knee. The video below is a good visual to understand precisely where the piriformis muscle is located in the body. [3]
How To Do Thread the Needle Pose:
- Find a comfortable position laying on your back, keeping your head, neck, and shoulders relaxed
- Place your left foot flat onto the floor (or onto a yoga block to modify the shape) with the left knee bent
- Bend your right knee and place your right ankle across the front of your left thigh
- Keep your right foot flexed to protect your knee joint as you encourage the right hip to rotate externally
- Place your arms beside you, or interlace your fingers behind your left thigh
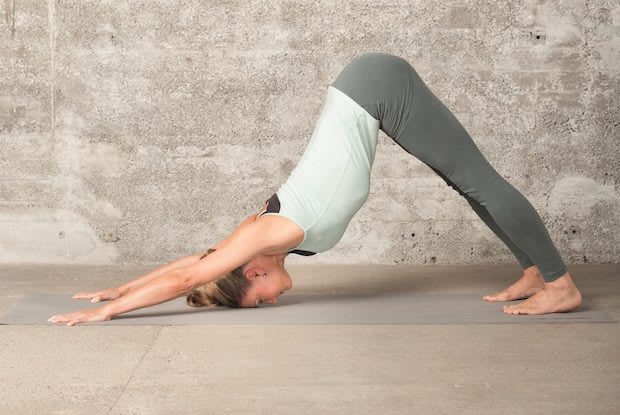
c. Downward Facing Dog
Downward facing dog is a pose that helps to open many areas of the body while strengthening in some places, too. In downward dog you are extending the elbows while flexing the hip, shoulder, wrist, and ankle joints.
One study in particular attached sensors to the body of a participant while they performed downward facing dog pose. Results demonstrate that downward dog proved to be effective at targeting the extensor muscles of the hip and ankle. Downward facing dog appears to target important muscle groups for balance training as well, such as the peroneal muscles. Peroneal muscles are located in the lower leg and help with the movement of the foot at the ankle joint. [4][5]
Downward facing dog is effective at strengthening the external oblique abdominal muscles as well. The oblique muscles are part of our core muscle group and are essential muscles for core strength, stability, and balance. [6]
As you attempt downward dog pose (check out the explanation below), you may notice the feeling of a stretch through the muscles in your calf and a lengthening of the backs of the heels. This increased mobility in the lower body can help us to walk more efficiently and stand with a stable foundation.
How To Do Downward Dog:
- From a tabletop position on your hands and knees, place your hands shoulder-width apart, flat onto your yoga mat with the fingers spread evenly
- Place your feet hip-width apart and tuck your toes under, while keeping the knees quite bent
- Reach your hips up and back away from the hands as you lengthen the arms
- Your body now resembles an upside-down V shape, good job!
- In this shape, work to keep the arms and spine long, the hips reaching back, and the heels reaching down towards the floor
- Note: you don’t have to straighten your legs! Try keeping the knees bent and see what that feels like
- If downward dog is not accessible to you as a shape on the floor, try doing this pose from a standing position.
How to Modify:
- Facing a stable wall, stand one or two feet away from the wall with the feet hip-width apart
- Hinge at your hips, so your upper body is parallel with the floor, the arms are reaching long towards the wall, and the hands can press flat into the wall
- Allow the knees to soften (bend as much as you need to), and the feet to ground into the floor
Yoga Poses to Build Strength and Increase Balance
a. Chair Pose
Chair pose is performed similar to its name, as you aim to mimic the shape of a chair. Chair pose requires a certain amount of strength in the quadricep muscles and mobility in the ankles. Chair pose, also known as Utkatasana, is commonly understood as a Hatha yoga shape.
One study aimed to understand how yoga can benefit older adults. After two weeks of introductory classes, subjects performed chair pose while instruments attached to their body provided biomechanical analysis. Subjects stood one foot from a wall with their feet hip-width apart while holding a block placed between their knees. The subjects held chair pose statically by flexing the hips to a depth they were comfortable with.
Chair pose appeared to target important muscle groups for balance training, such as the hip abductors (gluteus medius, gluteus minimus, and tensor fascia lata). Hip abductors are essential muscles that enable us to walk, rotate our legs with ease, step to the side, get out of bed, and step out of a car. [7]
Furthermore, chair pose helped to strengthen the quadricep muscle. The quadricep is a muscle that enables us to walk up a flight of stairs with ease. We must maintain strength in our quadriceps as we age to prevent falls.
As we age, it is imperative to maintain physical strength and balance. More than one-third of adults ages 65 years or older fall each year, and the risk of fall-related injuries can increase mortality risk. [8]
How To Do Chair Pose:
- Place your feet hip-width apart in a way that feels natural for you
- Begin to bend your knees, and reach your hips down and back, so that there is plenty of weight in the heels of your feet
- Reach your arms forward, nice and long, as you lift your chest up slightly
- Make sure to engage your core by drawing the navel in towards your spine
- To modify the shape, repeat the steps above but leaning with your back flat against a wall, and place a yoga block between the knees to create more stability in the legs
- Hold for five rounds of breath and repeat a few times
b. Warrior II
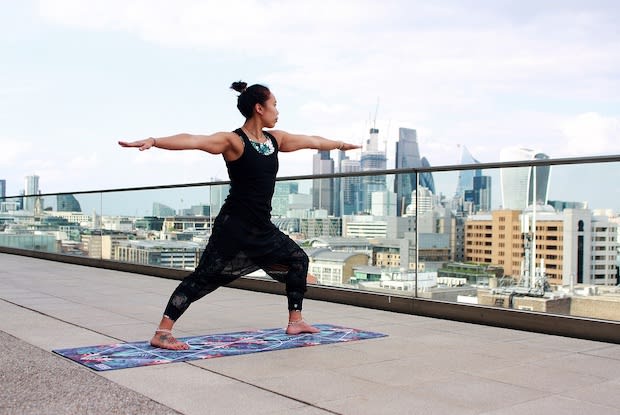
Warrior II pose is a shape that requires strength and body awareness while providing increased mobility in the hips. In one study titled the Yoga Empowers Seniors Study (YESS), a yoga intervention was offered two days per week for one hour for 32 consecutive weeks. The goal of this study was to offer safe and challenging poses for seniors, target functional muscle groups, include shapes to improve balance, and include shapes to increase joint range of motion. [9]
Warrior II was one of the shapes included in the sequences offered in this study for its ability to strengthen the legs while increasing range of motion in the hips.
How To Do Warrior II:
- On your yoga mat, place one foot towards the top of your mat, and the other foot towards the back of your mat while keeping your feet hip-width distance apart
- Create a 45-degree bend in your front knee, with the front toes pointing forward (towards the top of your yoga mat) — this creates an external rotation in your front hip
- Your back leg can be straight, with the back toes pointing towards the front of your mat on a 30-degree angle — this creates an internal rotation in your rear hip
- Extend your arms away from each other, parallel to the floor
- You can feel the shoulders stacked above the hips with a slight rotation in your trunk, and allow the hips and chest to point in the same direction — find a position for the upper body that feels natural
- To modify, place one hand to rest on a chair for balance, and the back heel can is pressed up against a wall for stability
c. Tree Pose
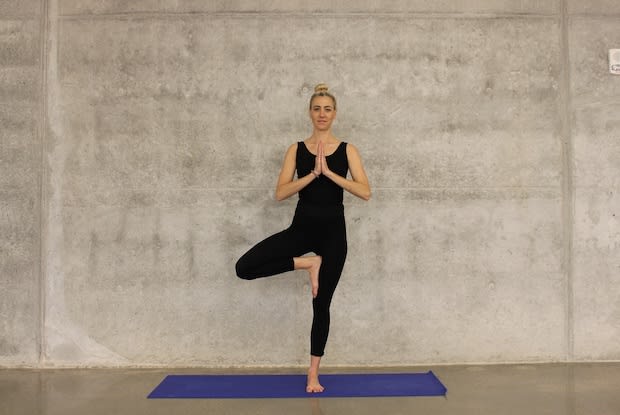
Tree pose is a one-legged standing balance; just like a tree, you are aiming to stand up tall and take up space while the standing foot grounds you down. Tree pose is a shape included in the YESS yoga intervention sequence, as mentioned above.
Tree pose is also a shape included in a separate study. This study looks at the effects of a yoga program on postural control, mobility, and gait speed in community-living older adults. This study was an 8-week, 80-minute therapeutic yoga program offered at a local continuing care retirement community. The mean age of participants was 84 years of age. Each session included pranayama (breathing exercises), asana (a series of yoga poses), and a relaxation period at the end of class.
The standing poses, including tree pose, were chosen for their ability to increase muscular strength in the lower body. This increase in muscular strength is said to target potential gait and balance deficits in the study participants. Tree pose was chosen to encourage participants to attain and maintain unilateral standing (the ability to stand on one leg). Subjects were permitted to use a chair for support but were encouraged to try the poses without support to improve balance and strength. [10]
How To Do Tree Pose:
- Ground your left foot into the floor
- Allow the right knee to bend as you bring the knee wide, and place the right foot on the inside of your standing leg below the knee
- If balance feels off, slide the right foot lower, touching the inside of the left ankle, with the right toes gently resting on the ground
- Bring your hands to your heart, palms touching, and stand up tall
- To modify, place a hand to rest on a chair beside you
Start Simple with Yoga
It can be easy to feel overwhelmed if you are new to yoga and are unsure where to start. The beauty of the internet is that there are tons of free resources for you to use if you want to start a yoga practice from the comfort of your own home. All you need is a quiet space, a yoga mat, and a yoga block or two. Keep a few pillows nearby for added comfort in some shapes. The six poses listed above are a great place to start as you begin your yoga practice.
Start with an attainable goal. Set aside ten to fifteen minutes each day to work through the poses listed in this article or any other shapes you wish to learn. A small commitment to your well being each day will add up over time. Consistency and simplicity are key. As you explore your yoga practice, you may notice small improvements in your balance, mobility, and posture with time.
The content in this article is intended for informational purposes only. This website does not provide medical advice. In all circumstances, you should always seek the advice of your physician and/or other qualified health professionals(s) for drug, medical condition, or treatment advice. The content provided on this website is not a substitute for professional medical advice, diagnosis or treatment.